Friday, 8 February 2019
Farm house from Empires at war
For our upcoming martlet campaign, a farm house, stables and a barn from Empires at War. Lovely kits these, pre-painted and simple and a lot of fun to put together.
I'm looking forward to battling over these, assuming I get through the first map!
Friday, 11 January 2019
Chain of Command -The Church on the Flank
However, the superior firepower and the heavy guns have allowed the Germans into Ranville itself, and Von Luck has sent a platoon of Grenadiers to take and hold the church on the flank.
The church at Ranville is being held by a platoon of 13 Para, who have used the time bought by 12 Paras valiant defence to reinforce their positions, however a lack of heavy weapons may be the deciding factor in this battle.
However, if you can't hit hard you have to hit smart, and the Lancs of 13 Para will be keen to show themselves every bit as good as the Yorkshire lot of 12 Para - and if they can hold off the Germans here, the bridges will be safe. All to play for!
The Germans have 13 points of support, possibly 14 if Von Luck smiles on them again.
The Paras will have to be dug in, and hold out against any long range HE such as the Schlepper (7 points) or the Pak 40 auf s307 (5 points).
I was planning to defend behind the church line, using forward Snipers to take out leaders, mortar observers and manned guns on halftracks. Entrenched LMG teams would hold two corridors on the left and right of the Churchyard, sit back and mop up the Jerries as they advanced.
2 units of 2" smoke mortars would deploy to blind enemy lmgs and attempt to enable the bren sections to split their fire across the enemy LMG teams. This would also force Jerry to move enemy sections to reduce fire.
The smoke could also be used to to blind the enemy halftracks. The mission requirements for this are to hold at all costs. It's a free hit for the British, we can lose this entire platoon and fight to the last man. A draw would be enough as well, so if they can grind this map out we'll win the campaign.
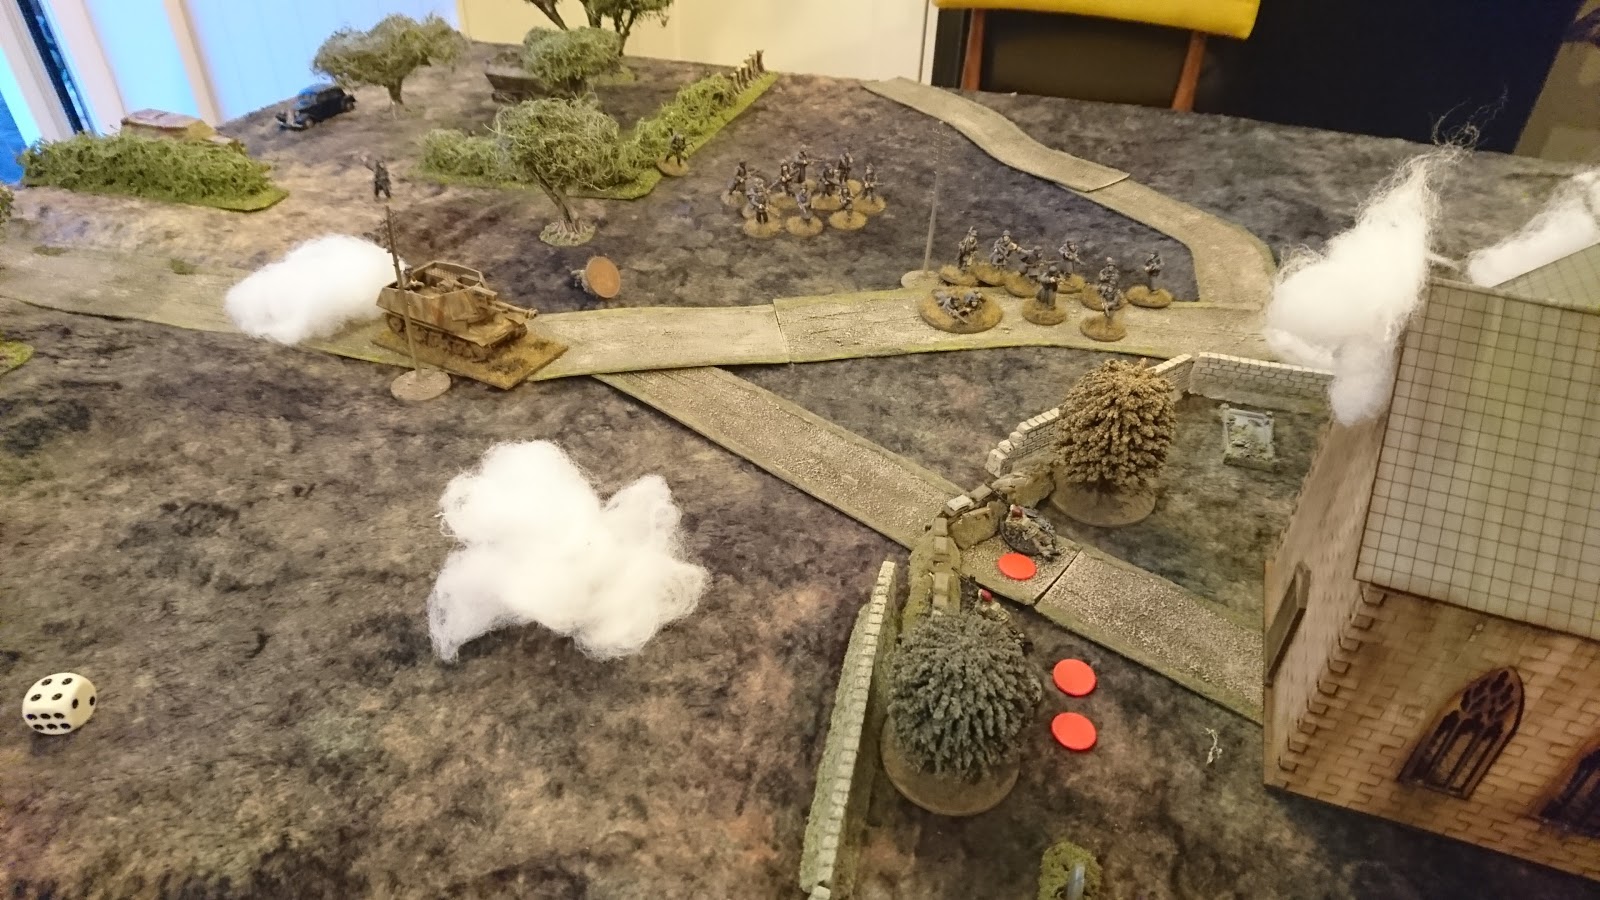
An interesting plan on paper. However, as you can see from the board above (from the German PoV) Sam had set the table up with the church slap bang in the middle, which would become important as the game started.
(Pictures are from Sam's account of the game, I only took a couple as my phone died :( )
We rolled off for FM, Brits on 10 and Germans got 11. We then rolled for Sams free moves, and he hit a 5. I set up my patrol markers at the front of the church door as per the map, and Sam moved his free patrol moves right up to my markers and locked them all down without me even getting a single move!
| What is left of an entrenched Para section tries to hold off the Germans |
This was a problem for me now, as my 'two corridor' defence relied on getting 1 JoP up and two back, but I was now going to be forced into the bottom left corner of the table - not a defence I had planned for. I placed one in the church (as far forward as I could manage) and the other two back on my left flank.
Sam kicked things off by bringing on a forward observer and calling in a ranging shot (naturalement), a section of Grenadiers, a Senior Leader and the Schlepper.
The Church was now acting as a giant screen from the Grenadiers as they moved up, and I was going to have to do something to slow these up. I deployed a sniper in the churchyard and a senior leader behind the church. The sniper had a pop at the observer, hit but no damage.
I wasn't really expecting the Schlepper (actually being played by a Hotchkiss H-39) and I was going to have to deal with the Grenadiers before they got through the churchyard. The smoke and PIAT teams who could deal with this beastie would be starting out a long way from the action in the rear JoPs. My plan was unravelling fast. The Schlepper surprised everyone by smashing a 105mm round into the church building, causing to it to begin collapsing, and forcing my sniper out into the open. Obviously the Schlepper crew were 7th Day Adventists!
| The church and rear area is stonked by mortars. |
| but they keep coming... |
Unfortunately, on the next phase the Schlepper rolled forward through the smoke and pointed its big gun at my guys in the entrenched position. The Grenadier teams opened up on them as well, killing the Junior Leader and a rifleman. Having no option now I deployed my second Senior Leader as back up to this section. My church sniper having redeployed out of the building was out of sight of the FO, so I brought a second sniper in cunningly concealed in the road and he took a shot at the German FO as well, missing.
The sniper also took a shot at the gunner on the Schlepper, and we rolled to see if it was the JL hit (which it was!) He was injured and lost a CI, so the Schlepper could either drive or shoot but not both - which it couldn't do anyway!
The german observer brought down the mortar barrage on the church, pinning my sniper team and senior leaders. The church was in danger of collapse, but the remaining PanzerGrenadiers began to move forward, finishing off my lads in the front of the churchyard.
| The Church collapses, rendering my forward Jump Off Point unusable |
The unpinned soldiers pulled back to the rear of the churchyard, and the Schlepper moved up. At this point I managed to deploy my PIAT team, who took a long range shot at the big gun but missed. They took the full force of the Germans closing in and were removed from the table. Another Light mortar team popped up and tried to block LoS to the Schlepper, but the shots went wide.
| Mortar smoke falling way out of where I wanted it to |
The remaining para sections tried to flank the church to the right and get to the German positions, but this opened up my left flank and the germans advanced and captured my JoP, ending the turn and finishing the game.
| Paras try and flank the Germans |
Thoughts.
This Platoon were a throwaway so I knew I could be a bit less cautious, but my plan to hold a deep line and force the Germans to attack down two sides was disabled by the patrol phase being so short. This wasn't intentional on Sams part, you only need 3 free moves to get a patrol marker 24" up the table, but as the Brits started off in the middle of the table we were always going to struggle to move very far.
Digging in is good for veterans, but they are always going to be targets for barrages and HE. It might take a few phases to whittle them down, but you need to use that time to bring supporting forces up. I struggled to deploy my 2" mortar and PIAT teams, and when they did come on they failed to shut down the Schlepper.
It's down to the final map and the final game. see what happened here
Friday, 28 September 2018
40k Kill Team
So this bad lad arrived recently, and has got me looking through my bitz boxes again to put together some 40k 'Kill Teams'.
This is a fast paced skirmish introduction to 40k, with a dedicated board (30' x 22'), set rules for each 40k faction included in the rulebook and comes with Adeptus Mechanicus and Genestealer Cult figures.
It suits me as I have always had access to little teams of 40k figures, Chaos Space Marines, Loyalists, Orks etc. I've also got the Deathwatch Overkill set and Dark Vengeance boxes which give me access to not quite full 40k armies but more than enough to be getting on with for Kill Teams.
I've knocked up an Iron Warriors kill team with some cultists, but haven't had a chance to play with them yet.
Iron Cross - Battle of Breville!
We played a Breville scenario (again) where Paras and Shermans attacked a battalion of Osttruppen supported by Panzer IV's and 21st Panzers converted french half track assault guns.
The British forces had a special rule that allowed them to roll for extra Command tokens, and the Ostruppen had the opposite rule that forced them to lose Command tokens. Command tokens perform a similar role to the dice in Bolt Action, allowing the activation of one unit, however a single unit can be activated multiple times (with an increasing level of difficulty each attempt).
The 'Reaction' mechanism allows a unit to attempt to interrupt an enemy activation, with a chance of stealing the initiative.
Movement and shooting is simply handled, infantry is represented with 5 models to a unit (which may be a section or platoon depending on your scale). Combat effectiveness is handled with morale tokens (like Pins in Bolt Action or Shock in Chain of Command). Morale tokens greater than a units morale cause that unit to be removed.
The British forces -
2 x Sherman Platoon (3 Sherman V and 1 Sherman Firefly)
1 x Sherman Platoon (reserve)
5 detachments of Paras (Elite)
1 6 pounder Anti Tankgun
1 Sniper
2" mortar team
The Germans -
1 HQ detachment
5 detachments Ostruppen
1 MG42
1 Pak 40
1 Sniper
3 Panzer IVH
3 Pak 40 Half Tracks
As there were 4 of us playing, we played 2 v 2 and I was given the command of the German Infantry battalion. We set up first, German Panzers off the board until turn 2. The British would come on first turn.
The Osttruppen were deployed high up the table on the orders of the Panzer Commander, the Pak 40 had a good position overlooking the fields and two detachments were positioned manning the hedgerows. The MG42 took up residence in a building overlooking the fields and a sniper was positioned along with a blind in a different building. More Ostruppen holed up in the buildings in the village, and with that we waited.
A few Shermans trundled on - two on our right flank, out of sight of the Pak 40, and immediately engaged the Ostruppen in the hedge. More Shermans came on our left flank, and although the Pak 40 tried to react they were not ready, and when they finally were ready the initial shooting was wayward.
The Ostruppen on the right fell back and regrouped in the woods, and the Paras advanced through the fields. They also brought up their 6 pounder anti tank gun, which engaged our ATG with some minor success. The 2" mortar also started to drop rounds near the Pak 40.
The British paras started moving up through the fields, and were met with withering fire from the MG 42 nest positioned in the houses. The Shermans poured fire on the Ostruppen, who withdrew and rallied at one point.
now the Pak 40 gunner found his range, and in quick succession the British 6 pounder and a Sherman were destroyed. More MMG fire, coupled with accurate sniper fire, started to break up the British units and when the Pak 40 took out one of the Sherman 17 pounders, the British attack faltered.
The Pak 40 came under a lot of fire from various units, but with some good command morale rolls we kept the markers down, and also grabbed the initiative. The Panzer IV's trundled on and began a battle with the shermans, losing one Panzer but two more Shermans getting knocked out including the other Firefly 17 pounder.
The Pak 40 was finally destroyed by the 2" mortar. The Shermans drove forward over the ridge, and the Panzer commandant ordered the SPG halftracks to advance.
The Paras continued to advance through the fields, but were rebuffed by the MG42 in the farm house and the sniper. The Ostruppen fell back before the Shermans, who were now engaged by the SPG's. although the soldiers had packed some Panzerfausts, they didn't get to use them.
At this point, the Brits realised they couldn't really win the battle even with a troop of shermans in reserve, so opted to take out the Pz IV's and then retire, to return at a future time with overwhleming numbers.
A brief and fierce firefight began between the remaining Pz Iv's, the SPG's and the Shermans, and the final Pz IV exploded, the British claiming a 'moral' victory and the Germans successfully defending the outskirts of Breville.
A fun, fast game that lent itself well to multiple players and didn't ever really get bogged down with looking up rules etc. I certainly enjoyed it, and would look to perhaps doing a similar scenario with my Kursk figures.
Wednesday, 18 July 2018
Chain of Command - Kampfgruppe von Luck: return to the Corridor of Death!
After the remnants of 12 Para counter attacked into the hedgrows outside Le Bas de Ranville in the last game, the Germans pushed back into the outskirts of the town - although a little more cautiously this time, after the initial probe was defeated by a flamethrower and a good slice of luck in game 3.
von Luck is still happy with the progress so far, giving the Germans +1 to support points. The men are still reeling somwhat from the casualties so far, so no bonus to morale. Sam has also brought together some battered sections from his first platoon to make a full strength Platoon for this game.
The Germans have 20 points of support, and again without me knowing this consisted of -
Werfer Barrage
81mm mortar
Sniper
Medic
Senior Leader
Car
2 Halftracks
and possibly an MG42 (although we didn't see it in this game)
I had 7 support points, and went for a flamethrower and a Vickers MMG. The final Bren team turned up out of the blue, so I had not far off my previous list for this map -
2 x SL
1 Sten section + JL
2 2x Bren section
PIAT
2" mortar
Vickers
Flamethrower.
This time the Germans took a different approach, dispensing with the Schlepper and bringing two squads of Grenadiers on in halftracks. The Werfer Barrage again hampered the deployment of the British Paras, but just as the Germans got close enough to start threatening Jump off Points, the Barrage was lifted by a turn end.
(apologies for the picture, my phone has had an incident and isn't playing nicely at the moment)
| The Corridor of Death. Again! |
The German Mortar barrage then started, although the lack of targets (in part due to the Werfer barrage but also some strategic deployment on my part) meant that once the ranging shot came in, the barrage was delayed for a phase - then another phase, and another and another.
| Para section on the prowl |
All the while the Germans got closer. The Brits prowled amongst the courtyards, but no Germans came over the walls. We couldn't locate them either, so there was no lobbing Grenades over the wall indiscriminately.
The Halftracks edged closer to the town, down the corridor of death, and disgorged two sections of Grenadiers. At the same time, the mortar barrage came down, but not where it was originally planned but closer to the German positions, pinning one squad of Brits and one of Germans. The Para sniper took out the mortar observer to ensure the Barrage wasn't moved back onto the British positions, and a Vickers MMG opened up on the Germans in the sunken lane.
Unfortunately, the MMG shots missed and the Germans took advantage of a double phase to jump over the wall into the courtyard (scene of ferocious fighting in the last battle) and engage a squad of british and a PIAT team in hand to hand combat. The british were wiped out, and the Germans consolidated into a strong position to continue the battle, and although the flamethrower team popped up and tried to cause some shock, they weren't as successful as the previous time and the few soldiers of 12 Para A platoon pulled back to the Chateaux for a last stand.
Meanwhile, on the flank the platoon of 13 Para have been guarding the Church at Ranville, and are soon to meet the Germans head to head in a crucial battle in this enjoyable campaign.
As a little note, 'A' platoon of 12 Para have held out for 6 consecutive maps, and the final order of battle for the platoon is -
37 men in total -
12 men killed in total, and 2 men POW. Several injuries over the whole campaign so far, and 5 support team members killed or injured. They've put up a fierce resistance to a very powerful fighting force, and if the chaps from 13 Para can hold out we'll save the bridges. If not, it will go down to the wire on the last map!
See how 13 Para got on here
Friday, 29 June 2018
Chain of Command Kampfgruppe von Luck - counter attack among the Hedgerows
After repulsing the German attack on the town of le Bas de Ranville in the last game, the remaining soldiers of the Platoon were ordered to counter attack.
As this was the British seizing the initiative in the campaign, the Paras would get 10 points of support and the Germans would be forced to defend map 2 (Probe among the Hedgerows). Victory for the Brits here would mean the campaign was won, however equally important this game would see another turn of the Germans 8 used up. To take the town and recapture the bridges will require the Germans to win the next three games on the bounce, no mean feat in itself.
Also, as I was still using the battered remnants of my initial platoon, I still have one fresh platoon of 12 Para as well as the brave boys of the 13 Para holding the church on the flank. Even if they can't break the germans down here, I can afford to be a little braver taking casualties in an attempt to stall the germans advance.
Back on map 2, this time the British would be attempting to get a unit off the German edge. Sam faithfully recreated the original map, and we started with Force Morale rolls. Von Luck has cooled his enthusiasm somewhat with the German defeat in the last game, so the Germans roll a straight FM roll (no modifier) and the british get +2 for Elite Paras, however the Germans rolled a 5 and the british a 2 (modified to 4) so the Germans started on 10 and the Brits on 9.
Still missing elements of the Platoon, I rolled for the PIAT and the Bren team who had still not showed up - the PIAT team turned up but no Bren team still, meaning I'd be facing Sams German Platoon with -
2 x SL
3 x JL
2" mortar
PIAT
Sniper
3x Bren teams
2 rifles.
4 Stens.
with 10 support points, I opted for -
6 Pounder Anti Tank Gun (figured I'd see the Schlepper in this one!)
3" mortar Observer
Bren Team
which would give me two full sections of double brens, one with an extra 2 rifles, and a 'kill team' of Stens again. I had sourced a rather lovely car (a 1938 Delahaye Figoni et Falaschi Coupe), for 1 point I could have used it to zip down the road but I felt it would be unlikely to survive a mad dash down the road.
![]() |
| Figoni et Filaschi 1938 Coupe |
Pak 40 auf s307(f)
MG42 team
Sniper
Senior Leader
Being the attacker for a change meant I got free patrol marker moves, and I had three to get my chaps up the central road. Although I had a vague idea of a plan, I'd been really busy at work that week and was late getting to the club, so I was initially a little random in my JoP positioning, getting one in the middle of the board, one over on the left flank in the hedgrow and one inside the courtyard again.
The Germans went first, Sam rolling a triple 6 on his first turn. Luckily for the Germans there was no Preliminary Bombardment to lift! Two sections deployed in the orchard area, and on the Germans second turn a Pak 40 auf S307(f) rumbled on to the road. I was expecting the Schlepper to turn up, and accordingly spent 5 of my support points on an airborne 6 pounder Anti Tank Gun. This opportunity was too good to miss, and on my turn I deployed the ATG in the hedgrow opposite the road and fired into the side armour of the reconditioned french vehicle.
Although the round struck home, the 7 AP dice only gave three hits, and the German Halftrack/SPG rolled two saves, which resulted in the halftrack suffering a point of shock and the driver stunned. The germans countered with an MG42 tripod mounted opening up on the gun, killing a crew man and applying some shock.
| 6 Pounder spots a German Halftrack. Or is it a French Self Propelled Gun? Shoot it anyway! |
On my right flank, I deployed a senior leader and a mortar spotter. I had been on the receiving end of a mortar barrage before, and knew how crippling it could be, but the spotter round flew off wide of the mark and I would need another turn to adjust it.
The spotter round had, however spooked a section in the orchard who charged out into the field, probably remembering the damage mortar barrages do in trees. This was an opportunity for putting some hurt on the Germans as well, and I deployed a section outside the walls who let rip into the German squad, killing three men and piling some shock on. The Germans tried to escape back into the orchard, but a short roll for movement meant they would be on the receiving end of another burst of Bren fire. They turned and prepared to return fire themselves.
Meanwhile back on the left flank, the 6 pounder fired again, this time achieving 2 net hits. The halftrack was immobilised and more shock piled on. The MMG returned fire on the gun again, but the hits bounced off the 6 pounders gun shield. The section on the left flank opened fire on the gun as well, killing one man and putting on more shock, but the 6 pounder returned fire on the half track a third time, and this time it exploded spectacularily. The 6 pounder finished off the action on the left by firing a HE shell at the MMG team, killing two of them dead and putting shock on the rest. Job done on that flank, but I still needed to get a team off the board and it was a long run over open fields on that side.
| Shocked into inaction, crippled and then finally blown up by three shots from a 6 pounder ATG |
On the right, the spotter round had dropped long and I needed to shift it across, but before I could, the Germans deployed a sniper who took out my forward observer with his first shot. Ouch!
The shot up section on my right turned and fired, causing two casualties and plenty of shock. Two sections slugging it out in the open like this wouldn't end well for me, and I returned the favour on the (supposedly) retreating Germans, taking them down to 3 men and breaking them. They ran back into the woods, straight into the waiting clutches of a German officer.
Meanwhile another German section deployed in the long trees and started shooting up my now battered section. more kills and shock followed, the JL taking a hit (and saving a bren team) and although I brought on another section and some smoke to successfully cover the fire from this new threat, the Germans rolled a double phase, moved away from the smoke and fired on my battered section a final time, breaking them and forcing them to rout through the newly arrived section.
| British smoke a Grenadier squad, but a double phase allows them to move and return fire. |
German FM was down at 5, but this brought mine down to 3 and I decided to withdraw again. This gives me another option to play map 3 with this platoon, plus reinforcements.
We are down on numbers and pretty and battered though, 4 men lost from the core platoon equals 2 KIA and 1 injured from this map alongside the other 3 and 4 KIA, plus the 2 men missing leaves me 9 men down, although that is also what I started this map with. To fight again in the corridor of death? Who knows.
Doing the Maths, it looks like my platoon for replaying the Corridor of Death isn't far off the last time I fought it. 2 men return from the field hospital, however I have now lost 2 men from one of the Bren crews so they come straight in as replacements. This means that I have -
2 x SL
Sniper
2" mortar team
PIAT team
JL + 2 Bren teams
JL + 4 Stens
JL + 1 Bren team.
I still have 1 Bren team to roll for.
I also get 3 free entrenchments (as it's game 6 on map 3) and 7 support points, which could go towards a roadblock, another Bren team or another PIAT team, and of course a handy Flamethrower. It looks like the Corridor of Death may get the chance to live up to its' name again!
See how the Germans got on here
Saturday, 26 May 2018
Chain of Command Kampfgruppe von Luck Scenario 3
![]() |
| The Germans advance on the 'Corridor of Death'... |
First off, we set up the board. The terrain for this Scenario is pretty challenging, there are lots of high walls and several buildings, and we had to improvise somewhat by using low walls for high ones.
![]() |
| The board from the German side |
| ...and from the British point of view |
Lt Ding was glad that the 2" mortar had finally turned up, after being dispersed during the drop. His platoon was still short of bodies though, and they desperately needed time to organise the defence of the outskirts of the village. The Lieutenant called over the Naval officer who had been assigned to his company. "Lt Danby, do you think you could get hold of Warspite and get her to shell our previous positions? Jerry are forming up for a push and I'd like to hold them off for a while" he asked. A few minutes later, the telltale whistle of 15" shells told Lt Ding that his request had been successful, and he felt glad that the map readers had done their maths correctly. The earth shook with each impact, causing dust and dirt to fall from the rafters of the house he had chosen as his platoon HQ. He could well imagine the effect it was having on the Germans forming up.
The Naval Bombardment disrupts the germans for one campaign 'turn', and they may not use that platoon immediately. However, there is a risk that, for 5 support point of the Brits total 7, it may not happen at all (if I rolled a 1 on a D6!) I rolled a 6, and the bombardment took place. Of course, when I rolled for the Bren and the PIAT team they still didn't show up. But it wasn't wasted, as the Germans now only have 6 campaign turns left to win Scenario 5, plus I get a free entrenchement for every turn the Germans are delayed.
The plan is to have three layers of defence. Although I could work off the map to draw up these lines, until we had set the table up I wasn't sure how this would actually happen, or what my support choices would be.
The second line of defence was between the orchard walls and the southern buildings. I was happy to let sam take the southern buildings, as I was sure I could use the surrounding buildings (out of sight of the Schlepper) as a fire base, and use the elites in 'hard cover' to hopefully win the firefight.
Then, if this area fell, I would fall back (assuming I had bodies left) to the area I had designated as the 'Alamo', the three buildings in the bottom corner, where it would be fierce hand to hand combat. I had to hold the germans up, at the very least to cause some major casualties. These men of the 2nd platoon were expendable.
Not having the PIAT might be an issue if the Schlepper or some Halftracks trundled up, so I went for the PIAT team as a support choice, along with a bren team (to shore up my half section). My final three points went on a flamethrower team, as I figured if it got down to the buildings they would have a better chance of putting some shock and kills on the germans. I organised my platoon as follows -
2 x Senior Leaders
Sniper
2" mortar team
PIAT team (support)
1 JL + Section of 2 Bren teams + 3 rifles
1 JL + Section 1 Bren team (as support) and a rifle team of 5 rifles.
1 JL + team of 3 Sten guns
1 Flame thrower team.
The Sten section were my 'kill team' made up of the remaining sten gunners from the rifle teams and third bren section. Their job was to hold the 'Alamo' and use their devastating close range fire (16 dice at close range!) to finish off any depleted german sections that came too close.
Not a great deal of bodies, but at least it was 33 all in, compared to the previous games 14 and 19.
Sam had a full platoon of 3 Grenadier Sections, a Shrek team, 2 Senior leaders (one as a support choice), a sniper, a mortar spotter, and the Schlepper (all as supports). 36 bodies, 6 MG42s and plenty of long range HE.
Sam then rolled for the german 'Free patrol' moves, getting a 5 which enabled him to bring his 3 patrol markers right down the road, getting 2 of them 24" from his start off point. Straight away my '1st Line of Defence' was looking likely to be overran quite quickly!
After the patrol phases, I kept my Jops back intentionally as I assumed the Germans would deploy a Werfer Barrage again, and I had seen on other games that this can be somewhat nullified if the Germans take four or more phases to move to contact, you can hopefully build up a CoC dice and clear the barrage. Sam placed his JoPs quite far back as well.
![]() |
| Jops placed! |
We rolled for Force Morale, the Germans getting +1 on their roll due to von Lucks impression of the campaign so far, and the Paras getting +2 because - well, because they are Paras! We both rolled 6's, so both sides started with a FM of 11. This could be a long game!!
![]() |
| A german section deploys |
Sam went first, opening with a double phase, and the germans brought on a Senior Leader, a section and the Schlepper. With the Werfer Barrage still ringing in the paras ears, the only thing I could deploy my first phase was the 2" mortar, who promptly began to drop smoke on the road in front of the Schlepper.
The german attack started, somewhat predictably, with the whine and crump of the Werfer rockets. Lt Ding had his men well hunkered down in the celllars of the buildings in the location he had designated as 'The Alamo', the place for the Paras last stand. he hoped it wouldn't come to that. Out in the fields, the forward teams had set up and when the whine of the rocket mortars stopped, they heard the tell tale tracks of a Self Propelled gun rolling up the lane. In the fields to the south, the Paras heard the german squads moving up, climbing walls and issuing orders.
| Smoking the Schlepper - German mortar FO is in the ruined farm under the smoke! |
The German Mortar Observer turned up and called up his battery. I've been here before, pinned under a German mortar 'stonk'. I know that he's not got great lines of sight but he can see straight into my 'Alamo' position.
I've deployed my Platoon Sergeant in there as well as my shorter Bren section, and I need to start moving people. FInally the sniper turns up and I get a line of sight straight down the road. I can only see the Schlepper moving down the road (through the smoke) and the enemy mortar observer. the sniper fires,but sniper misses. Must be all that smoke!
| More smoke. The Schlepper is moving up but hasn't got any targets! |
The next few phases are a bit odd - the Germans can't get any 1's to activate the mortar barrage, and I build up some 5's but can't do anything else until the germans commit. Two more german sections turn up and start scaling the walls and moving through the fields.
![]() |
| More Germans rock up. The shock is accrued from running quickly (3D6) |
The germans got closer, and Lt Ding hoped his orders had been received clearly. He looked across at Corporal Ron Sondberg, who had the man-pack flamethrower at his side. If the Germans got too close, there was no doubt this would come into play.
I get another section on, my double bren section on the left flank and start moving them up to the Germans, although we have several walls and hedges between us. Although I could set up in overwatch I would only get one shot at the germans as they jumped over the walls, and then I would be on the receiving end of whatever was left, so I kept well back.
Whilst the German FO couldn't call in his mortar barrage, my sniper repeatedly fired and missed, he must have had 5 shots at him and all he managed was some shock (which the FO ignores anyway!).
![]() |
| Germans move over the high walls. |
| Moratr barrage falls on 'the Alamo', pinning a section, my sten section and a senior leader! |
A single mortar round, probably a marker, had crashed into the paras positions, but so far nothing had happened. Then, suddenly and without warning, the whistle and crash of German 80mm mortar shells began to rain down on the paras positions. Sgt Bier order his men to take cover where they could.
Having got (mostly) everyone on regardless of the Werfer Barrage, and the Schlepper had no one to shoot at, I had to get the Germans to commit, so my section of two bren guns on the left flank leaped over the wall.
![]() |
| Paras leap the wall to engage the germans in the corner of the field. |
There was a single section of germans on the other side of a hedge, although strangely they didn't open fire. Indeed, in the german phase they moved into a better firing position instead of firing, which was very odd. I had a CoC dice, but had failed to notice Sam had also got one. In my phase, I pulled the Para section back over the wall, hoping to entice the Germans to follow, but instead Sam played an 'interrupt' and opened fire on my section with the full force of 2 MG42 and 3 rifles. Ouch!
Over on the left flank, where Lt Ding had set up his command post, the germans had finally committed. He indicated to one of his section leaders, Sgt Tomlinson to take his men over the high wall and engage the germans beyond. As Tomlinson and his men doubled over the wall, the tell tale RRPppp of MG42 rang out. Those on top of the wall dropped back down on the British side. 5 men had fallen and Lt Tomlinson had been injured. This was not an auspiscous start.
We took 5 casualties and the Junior Leader took a wound as well, taking one of his CI's. Luckily the hits had only caused one shock, and the battered section finished their move over the wall.
Hearing the firing, Corporal Sondberg grabbed his 'Lifebouy' flamethower and leaped over the wall. The germans had pushed their guns through one of the thick, Normandy hedges, and were shouting excitedly. They didn't notice the British Para until he released a long gout of flame, straight into the bush.
The screams of the germans were terrible, and as Cp Sondberg jumped back over the wall he winked at Lt Ding. "They won't try that again Sir!" he smiled. Lt Ding could hear more germans running up to the commotion, and signalled for Sgt Tomlinson to take his men up the line of the wall and throw some grenades over. The Bren Gunner, Corporal Hammond who had palyed county cricket for yorkshire before the war took a mills bomb and launched it perfectly over the walls.
However, the german section were now within about 15 inches of my left JoP point, so I used my CoC dice to do an 'Ambush'. I placed the flamethrower team in front of Sams germans. The flamethrowers are pretty nasty, and have 12 dice hitting on a 4. I got 12 hits, and rolled something like 5 kills and 3 shock, which doubles to 6 shock. His Junior leader took a hit as well, and although the section were down to 6 men they weren't technically 'pinned'. I soon changed that though, as my second Senior leader arrived to order the badly depleted section to double along the wall and chuck some grenades over, which they duly did, however they only got 10" away from the germans so needed 11 to hit. One of the men duly managed to roll 11 and wang a mills bomb over the wall. We incorrectly rolled 3 dice for the grenade (it should have been 2 as although the germans were in light cover they count as in the open). they took another casualty and some shock, and were now 'pinned'. More grenades flew over the wall, and soon the section broke, running straight through another section of Germans who had turned up late to the party. This section then took the extra shock as their own shock, and it took both German senior leaders to stop all the sections from breaking.
Sam countered this, and as the flamethrower team withdrew, their work done so far, another squad of Grenadiers high tailed it into a building overlooking my battered bren section. Sam knew I didn't have any CoC dice left, but on my following phase I used a 1 to bring them back on as a proper team, 9" from my second JoP and right in front of their building! Again, a gout of flame leapt into the building, causing a couple of kills but immense amounts of shock, injuring their Junior Leader (who was knocked out in all the confusion). They returned fire on the flamethrower team, but with all the shock affecting their MG42 gunners, they only got one kill.
Inside the walls, Lt Ding motioned to the flamethrower team to head towards the door of the building that seperated the Germans from the British positions. As he did so, through the window he saw the square helmets of another german section moving into the building. The flamethrower fired again, through the window of the building. A single burst of MG fire came back, and a second burst was all that was needed to cause the Germans to fall back out of the building the way they had come.
![]() |
| Flamethrower returns to wreak havoc on the German Grenadiers |
The flamethrower team had one shot left, and fired it into the building again. This was enough for the terrified germans, who broke and fled back up the road, leaving their unconscious OberGefreiter behind. The corridor of death was certainly living up to its name!
![]() |
| Paras from the Flamethrower team move into the bulding to capture the enemy Junior Leader |
Fuel spent, the Flamethrower team were ordered by the Platoon Commander to go into the building and retrieve the wounded german. This, along with the two broken sections, 2 injured JLs and then the capture of a JL had taken Sams Force Morale down to 4, and although on my right flank the mortar barrage had pinned the sections there, killed a few men and removed my support bren team completely, my Force Morale was still at 8. The Germans lifted the barrage and unpinned their one remaining full section by ending the turn, but unfortunately this also caused one of the broken German sections to rout, and Sams 'Bad things' roll for the JL routing took his FM down to 2. This cost him a JoP and 2 command dice, and he decided to withdraw.
Over on the right flank the mortar still fell, and Sgt Bier did all he could to keep the mens heads down. He knew from experience that once the mortars stopped, the germans would advance to contact but when they stopped no Germans came. Several Paras lay dead in the walled areas however, casualties from the barrage, but it seemed the Germans had pulled back. On the left flank, Lt Ding saw that a german NCO was wounded in the now smouldering building, and sent two men in to drag him out and save him. The Germans had retreated, taking their injured and shocked men, but leaving the NCO. The Paras had won this phase of the battle, but Lt Ding knew they would soon be back. As he surveyed the damage caused by the german assault, he wondered if he had enough men for a counter attack - if he hit the Germans whilst they were still reeling from this defeat, it might buy more time before the second wave of gliders came in with tanks and 17 pounders.
However the Germans had pushed up high into the town, and were far from their JoPs. Along with 12 casualties from the flamethrower and the captured JL in the battle, the German platoon had also lost another 4 men captured in the withdrawal. Although the Germans had effectively lost the scenario, the mortar barrage and the initial burst of MG42 fire had caused several British casualties as well, although some of these had come from the support teams so didn't affect any numbers.
I had lost the sniper and a sten gunner in the mortar barrage, plus a full bren team (from support) and two rifles. Equipment such as Brens, MG42 and SMG's are replaced rather than lost, only men, so that counts as 2 rifles lost.
In the other section I had lost 5 rifles.
I'd also lost a single man from the FT team, to give a total of 13 casualties in total, however 4 of them were from support and are ignored, leaving 7 men from the platoon injured. Less 3 for the difference in FM, that leaves me 4 casualties, 2 KIA, 2 MIA and 1 back in action. along with the other 3 men KIA from the first game and 2 POWs, that's 9 men down on a full platoon.
A victory for the Brits enables me to seize the initiative, and push the germans back onto the previous map.
You can read what happened here
Chain of Command - Kampfgruppe von Luck. Delaying action at the Chateau
The final game if the campaign is, fittingly, on the final map, and pits the remaining soldiers from a company of 21st Panzer Grenadi...
-
Scenario Two - Probe amongst the Hedgerows After the initial contact with the German Patrols ( Scenario One ), the British paras (alre...
-
Taking a break from Bolt Action, myself and Sam had agreed to play a game of Chain of Command, his PanzerGrenadiers against my British Parat...